Home
 
timeclocks made in usa
 
Acroprint Motor and Cam
Motor and Cam Kit


Time clock motor and solid brass cam combination for Acroprint 125/150 time clocks. These two parts are normally replaced at the same time.


Our Price: $49.95
Shipping will be calculated during checkout.  
 
AP125 motor and cam

Accessories & Supplies:

DetailsIDProduct NameDescriptionPriceAdd To Cart
Click 21 1900L-2 Time CardTwo Sided Time Card, Box of 1000$41.25
Click 187 Acroprint PK656 KeyModel 125/150 key$6.00
Click 186 Acroprint AP125 Ribbon 2-PackAP125 AP150 Ribbons$18.00
Click 134 Acroprint AP125 Stamp HandleAP125 Stamp Handle$6.25
Click 205 Acroprint 125 Stamp Hammer AssemblyAcroprint 125 stamp and swing arm$26.00
Click 204 Acroprint 150 Stamp and platenAcroprint 150 stamp and platen assembly$29.00


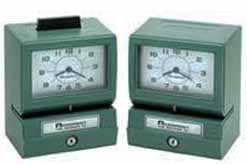
This is the Acroprint motor and cam parts combination
                           Acroprint.jpg

  • If your green colored Acroprint 125 or Acroprint 150 is losing time,
    this is normally the cause:
    - The motor slows down, and the cam visibly wears down.
    - Look at the peg on the cam. 
    - If it is grooved, then it is not pushing the minute overthrow pawl far enough.
       Since the pawl does not reach far enough to grab the minute impulse gear,
       this causes the clock to lose time.

  • Replacing the motor alone normally does not solve the problem,

  • and you have to remove the cam to remove the motor,
    so it's no more work to do it right the first-time

  • Time to complete, start to finish for a newbie:  30 minutes

  • Tools needed:  1 allen wrench, a flat blade and a phillips screw driver.

  • Guarantee: Two Years

  • Need help doing this?  No problem.
    Call us, we will "be there with you" as you make the repair.

Acroprint 125 parts, acroprint125 parts, acroprint parts, acroprint 150 motor

Click here to download the Acroprint owners manual

To change the motor and cam:  

You will need either a large flat bladed screwdriver, or a medium Philips driver.
And a small one of either.
Unplug the clock.
Remove the ribbon.  The Pentagon hole goes in toward the wall, round hole out to you.

Set the clock for any time, as long as the minute hand is straight up on 12.00
Remove the minute hand.  Keep the nut, hand, and washer in order.  That's critical.
Remove the hour hand with the flat screwdriver.  Wedge it in between the face and hand,  twist and wiggle it off.  You will press fit it back when you reassemble.

Remove the face. Remove the screws holding the motor and dial plate assembly.  Four large screws between face positions 7 and 5.  This normally takes a little "whack." it tips back and up, then lifts out. It goes back together much easier.

Disconnect (or cut) the motor wires.  It's easier to cut and make new ends on the wires, then twist them together and wrap with a wire tie or electrical tape when done.

Using an allen wrench, you will back out the cam locking screw, and put it in to the new cam.
Remove the motor, and replace it.
Put the cam back on, with the cam's knob, called the minute impulse cam, facing out.
Align the locking nut with the flat spot on the motor shaft and make it tight. Not killer tight, just tight.

Put the dial plate assembly with new motor and cam back on, put the 4 large screws back in, and snug them up.  It should reassemble smoothly.  Shorten the motor wires so there's not a lot slack, you have to make it easy to take off the cover and put it back on now and then. You can use a plastic wire tie to hold the wires in position - that's what we do.  Wrap the wires.

Put the face plate back on.  Press the hour hand back in to position.  Keeping the screw, minute hand and washer (or lock washer) in proper order, put the minute hand back on.  Aligned to 12, like it was before.

Make sure the ribbon is installed correctly.

Test it.


How to replace an Acroprint 125 / 150 punch clock motor
Photos below.

  • 1) Unplug it, remove the case
  • 2) Tools needed: 
    Size 2 phillips screwdriver, Size 3 phillips screwdriver
    Thin flat blade screwdriver, a new time clock ribbon
    Two wire nuts, new Acroprint motor and cam


  • Set the clock so that the time shows any hour, and the minutes on 12 - straight-up.
  • UNPLUG the CLOCK
  • Cut the motor wires about an inch away from the motor
  • Remove and discard the ribbon
  • Remove the minute hand.  Note that there is a locknut underneath the hand, and a very small, specialized screw for the hand.
  • Using a flat blade screwdriver, get under the hour hand right at the center and wiggle it up and off.  It's on a sleeve.
  • Remove the 4 face screws and the face.  This exposes the frame.
  • Using the allen wrench, remove the cam and put the allen screw aside.
    --  Note:  You will be reusing the allen screw.
  • It's okay to force (twist and turn) the cam position, the motor is going away, anyway.
  • Remove the 4 large screws on the fork. 
  • Wack the back side of the motor frame assembly to release it.
  • That big gear controls the minute alignment.
    --  It is adjustable after you put it back together to center the minutes
         if you need to.
  • See the allen set screws, it's easy to figure out.
  • Remove the motor screws. Sometimes there is one long screw and one short.
     Note that the long screw goes at the bottom.
  • Replace the motor.  We put a drop of locktite (or nail polish) on the motor screws. Replace the cam.
  • When replacing the cam, make the cam flush with the end of the motor - closest to you, not the frame.
    Leave just the siightest space between the cam knob (minute impulse knob) and the motor frame.  It should not rub.
                          Nearly.....Done!
  • Put the motor and gear assembly back on.  Lower it in place with the black gear centering in the movement.
  • Put the face back on.
  • Slide the hour hand back in place.
  • Put the minute hand back on, straight-up.  Lock nut, hand, screw.  In that order.  Plug it in and test, then set the time.